現在 Build Insider という Web サイトにある Xamarin 逆引き Tips を見ながら Xamarin の勉強を行っている。その中に、「Xamarin.Formsでwitterクライアントを作成するには?」 というページがあり「2回に分けて紹介」と書いてあるのだが、その第二回目の連載があがっていないようであった。
http://www.buildinsider.net/mobile/xamarintips/0052
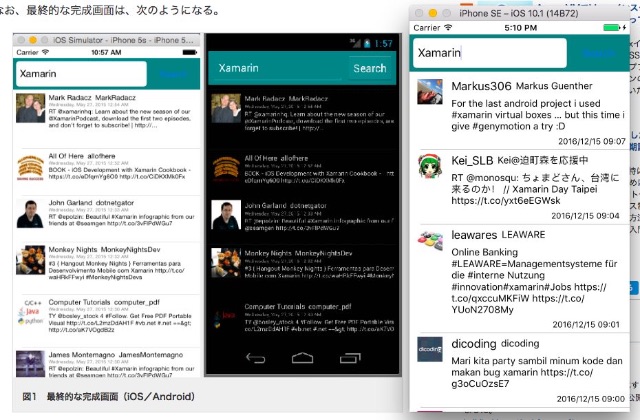
第一回では CoreTweet のインストールと Twitter API との接続の確認、指定した文字での Tweet の検索まで実装しており、第二回ではカスタムセルを使用した表示方法を行う予定だったのだろう。第二回目の記事は無いが完成画面のスクリーンショットがあった為、それを元に似たような感じで実装してみた。
まずは Tweet の情報を保存する為のクラスを作成する。
public class Tweet
{
	public string ScreenName { get; set; }
	public string Name { get; set; }
	public string Body { get; set; }
	public string IconUrl { get; set; }
	public DateTimeOffset CreatedAt { get; set; }
}
アイコン、名前、スクリーンネーム、本文、時間を表示する。他に表示するものがあればここも変更する必要がある。
DateTimeOffset は初めて知ったのだが、CoreTweet で返ってくる CreatedAt が DateTimeOffset 型だったのでそのまま利用している。
次に、Tweet クラスを使う為に、_tweets 変数を宣言している箇所を書き換える。
private readonly ObservableCollection<Tweet> _tweets = new ObservableCollection<Tweet>();
_tweets の型を変更したので _tweets.Add の部分も書き換える。
foreach (var tweet in result)
{
	var tw = new Tweet
	{
		ScreenName = tweet.User.ScreenName,
		Name = tweet.User.Name,
		Body = tweet.Text,
		IconUrl = tweet.User.ProfileImageUrl.Replace("normal", "bigger"),
		CreatedAt = tweet.CreatedAt
	};
	_tweets.Add(tw);
}
ProfileImageUrl はそのまま使うと妙に小さかったので URL を置換している。
これでツイートを検索した結果名前やアイコン等を含め _tweets へ入れる事ができた。
次はツイートを表示する為のカスタムセルを書く。
public class TweetCell : ViewCell
{
	public TweetCell()
	{
		var icon = new Image
		{
			HorizontalOptions = LayoutOptions.StartAndExpand,
			VerticalOptions = LayoutOptions.StartAndExpand,
			WidthRequest = 50
		};
		icon.SetBinding(Image.SourceProperty, "IconUrl");
		var screenNameLabel = new Label
		{
			FontSize = Device.GetNamedSize(NamedSize.Default, typeof(Label)),
			VerticalOptions = LayoutOptions.Center,
		};
		screenNameLabel.SetBinding(Label.TextProperty, "ScreenName");
		var nameLabel = new Label
		{
			FontSize = Device.GetNamedSize(NamedSize.Small, typeof(Label)),
			VerticalOptions = LayoutOptions.Center
		};
		nameLabel.SetBinding(Label.TextProperty, "Name");
		var bodyLabel = new Label {
			FontSize = Device.GetNamedSize(NamedSize.Small, typeof(Label))
		};
		bodyLabel.SetBinding(Label.TextProperty, "Body");
		var createdAtLabel = new Label
		{
			FontSize = Device.GetNamedSize(NamedSize.Micro, typeof(Label)),
			HorizontalOptions = LayoutOptions.End,
		};
		createdAtLabel.SetBinding(Label.TextProperty, new Binding("CreatedAt", stringFormat: "{0:yyy/MM/dd hh:mm}"));
		View = new StackLayout
		{
			Orientation = StackOrientation.Horizontal,
			Padding = 5,
			Children = {
				icon,
				new StackLayout {
					Orientation = StackOrientation.Vertical,
					HorizontalOptions = LayoutOptions.FillAndExpand,
					Padding = 0,
					Children = {
						new StackLayout {
							Orientation = StackOrientation.Horizontal,
							VerticalOptions = LayoutOptions.Center,
							Children = {
								screenNameLabel, nameLabel,
							}
						},
						bodyLabel,
						createdAtLabel
					}
				}
			}
		};
	}
}
StackLayout を駆使してうまい具合にアイコン、名前、本文、日時を並べていく。
フォントサイズの指定が長ったらしくてアレなんだけどこういう物なんだろうか。。
最後に ListView で ItemTemplate を使うように書き換える。
var listView = new ListView
{
	ItemsSource = _tweets,
	ItemTemplate = new DataTemplate(typeof(TweetCell)),
	HasUnevenRows = true,
};
ついでに高さがコンテンツの内容に合わせて可変になるように HasUnevenRows = true もつけておく。

これで Twitter っぽくなった。

コメント