
React Native の勉強用に WordPress のブログリーダーアプリを作ってみた。あんまり細かい解説はしない。React Native 使うとこんな感じにアプリ作れますよという事でメモ代わりに置いておこう。
初期設定
React Native プロジェクトの作成と必要な npm のインストール。
$ create-react-native-app WordPressReader
$ cd WordPressReader
$ npm install --save react-navigation
$ npm install --save native-base
react-navigation は React Native でタブとかページ遷移とかするのに便利なライブラリ。
native-base は React Native で使える UI コンポーネントライブラリ。これ使うだけで見た目がソレっぽくなるしテーマも使える。
以下のコマンドでエミュレーターを実行できる。
$ npm run ios
単に npm run して expo から QR コードを読み込んでも良い。
初期ページの作成
標準で生成されているであろう App.js を書き換えていく。必要なのはブログ記事の一覧を表示する BlogScreen と Web ページを表示する WebViewScreen の2つ。アプリ内ブラウザは本当は嫌いなんだけどまぁ勉強の為ということで。
$ vim App.js
import React from 'react';
import { AppRegistry } from 'react-native';
import { StackNavigator } from 'react-navigation';
import { Container, Text } from 'native-base';
class BlogScreen extends React.Component {
	static navigationOptions = {
		title: 'Entry List',
	};
	render() {
		return (
			<Container>
				<Text>BlogScreen</Text>
			</Container>
		);
	}
}
class WebViewScreen extends React.Component {
	static navigationOptions = {
		title: 'WebView',
	};
	render() {
		return (
			<Container>
				<Text>WebViewScreen</Text>
			</Container>
		);
	}
}
const App = StackNavigator({
	Blog: { screen: BlogScreen },
	WebView: { screen: WebViewScreen },
});
AppRegistry.registerComponent('App', () => App);
export default App;
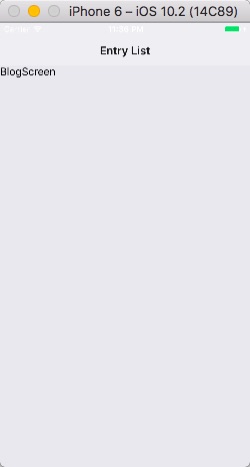
これでエミュレータ見るとこんな感じ。ページ2つ作ったけどページ遷移する機能が無いので BlogScreen だけ表示されている。
ファイルの分割
ちょっと長くなりそうだからファイルを分割する。
App.js から BlogScreen と WebViewScreen の2つのクラスを削除しそれぞれ BlogScreen.js/WebViewScreen.js の2つのファイルを作成。App.js に import を追加して分割したファイルを読み込む。あといらなくなった native-base の import は削除。
App.js の中身はこんな感じ。
import React from 'react';
import { AppRegistry } from 'react-native';
import { StackNavigator } from 'react-navigation';
import BlogScreen from './BlogScreen';
import WebViewScreen from './WebViewScreen';
const App = StackNavigator({
	Blog: { screen: BlogScreen },
	WebView: { screen: WebViewScreen },
});
AppRegistry.registerComponent('App', () => App);
export default App;
だいぶスッキリした。
BlogScreen.js の中身は以下のような感じに。class 宣言時に export default ってついてるのに注意。
import React from 'react';
import { Container, Text } from 'native-base';
export default class BlogScreen extends React.Component {
	static navigationOptions = {
		title: 'Entry List',
	};
	render() {
		return (
			<Container>
				<Text>BlogScreen</Text>
			</Container>
		);
	}
}
WebViewScreen.js も大体同じだから省略。
ブログ記事の一覧表示
WordPress ではブログ記事の一覧は以下のような URL により JSON 形式で取得する事ができる。
http://loumo.jp/wp-json/wp/v2/posts?_embed
実際にアクセスしてみるとわかるが非常に多くの情報を取得できる。が、詳細過ぎて使いにくい。なので WPPost クラス作る。
class WPPost {
	constructor(post) {
		this.post = post;
		this.title = post.title.rendered;
		this.content = post.content.rendered;
		this.thumbnail = this.getThumbnail();
		this.url = post.link;
	}
	getThumbnail() {
		var wpfm = this.post["_embedded"]["wp:featuredmedia"];
		if (wpfm != undefined) {
			return wpfm[0]["media_details"]["sizes"]["thumb150"]["source_url"];
		} else {
			return 'http://loumo.jp/wp/wp-content/themes/simplicity2/images/no-image.png';
		}
	}
}
特にサムネイルは記事によっては無いので上記のようにちゃんと確認しないと Thumbnail コンポーネントで使う際にエラー出る。
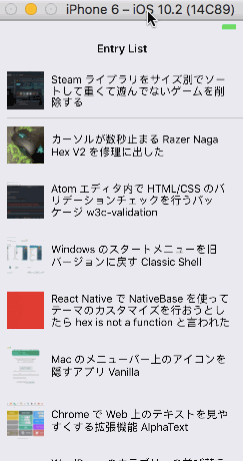
あとは JSON を fetch して List とか使って一覧で表示するコードをガッと書く。
export default class BlogScreen extends React.Component {
	static navigationOptions = {
		title: 'Entry List',
	};
	constructor(props) {
		super(props);
		this.state = { items: [] };
	}
	componentDidMount() {
		fetch('http://loumo.jp/wp-json/wp/v2/posts?_embed')
			.then((response) => response.json())
			.then((responseJson) => {
				for(var i in responseJson) {
					var p = new WPPost(responseJson[i]);
					this.setState({ items: this.state.items.concat([p]) })
				}
			})
			.catch((error) => {
				console.error(error);
			});
	}
	render() {
		var items = this.state.items;
		return (
			<Container>
				<Content>
					<List
						dataArray={items}
						renderRow={
							(item) =>
								<ListItem>
								<Thumbnail square size={80} source={{ uri: item.thumbnail }} />
								<Body>
									<Text>{item.title}</Text>
								</Body>
								</ListItem>} >
					</List>
				</Content>
			</Container>
		);
	}
}
ここまで書くとこんな感じに表示される。

webview の表示
記事一覧でタップしたらその記事を WebView で開く処理をいれる。
BlogScreen クラスに openUrl メソッドを追加。
openUrl(url) {
	this.props.navigation.navigate('WebView', { url: url })
}
ListItem コンポネントに onPress 時の処理を入れる。
<ListItem onPress={() => {this.openUrl(item.url)}}>
こうする事で記事をタップすると WebView 画面が表示されるようになる。
最後に WebView.js で Web ページを開けるように編集する。
import React from 'react';
import { WebView } from 'react-native';
export default class WebViewScreen extends React.Component {
	static navigationOptions = {
		title: 'WebView',
	};
	render() {
		const { params } = this.props.navigation.state;
		return (
			<WebView source={{uri: params.url}} />
		);
	}
}
できた。
というわけで React Native を使ってみたけどめっちゃ楽にアプリを作る事ができる。ざっと見た感じあんまり凝ったことしないのであればこれで良いかなぁという感じはする。
コメント